Nothing is more cheerful than a Christmas gif! No I didn’t forget the t, I mean the animated pictures with a couple of frames in them.

I created this melting snowman to put on my header for Christmas. And this flashing lights Christmas tree gif.

Here is a step by step guide to make the tree. Once you learn the basics it will be really easy for you to experiment and make some for yourself.
Step 1. Set up your document in Photoshop
Open Photoshop and create a new document for web (say 500 x 500 px).
Turn on Grids by going to View>Show>Grid.
Change the size for the grid in preferences. On a Mac go to Photoshop>Preferences>Guides, Grids and Slices, and on a PC go to Edit>Preferences> Guides, Grids and Slices.
Set the gridline to every 100px with 2 subdivisions.
Go to View>Snap to>Grid.
Step 2. Draw your image
Draw the simple triangle for the tree: easiest way is to draw a polygon (from shapes on tool bar) and set the sides to 3 in the options panel.If you need to change the colour, double click on the colour part of the shapes thumbnail in the layers panel. Photoshop puts each new shape on its own layer.
Then using the ellipse tool, draw a series of circles for the lights. Hold shift as you drag to make it a perfect circle. Once you have enough lights on your tree, switch to the move tool and alt drag to copy the lights. Just drag them very slightly so that there will be a tiny move between them. I then changed the colours very slightly on each of the copied lights so that when we put it all together there will be a gentle flickering effect.
I made the star by going to custom shapes in the tool bar, then selecting the star shape from the custom shapes panel in the options panel. You could draw one either. I made two stars of different colours and slightly different positions.
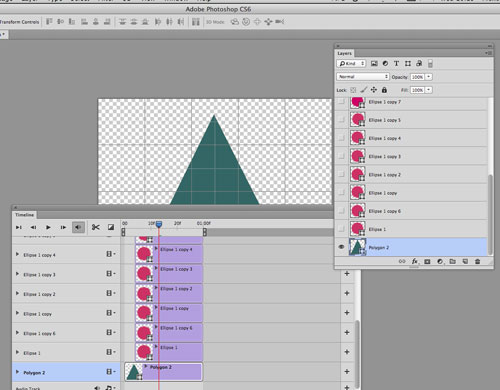
Step 3. Make it move
In Photoshop CS6/CC go to window>Timeline. In CS5 or earlier versions go to Window>Animation. Next click “make video timeline” in the timeline panel.
This puts all of your layers on a timeline. All of your layers are now in the timeline taking up all the time. Drag the timeline scrub to the right and left and the screen shows you what you will see in relation to a time change. Resize the frames by dragging and move them so that you get the timing right. This is the trickiest part but you will get it after a bit of toing and froing.
Step 3. Save for web
Go to File>Save for web and choose GIF preset.
At the bottom change loop options to “forever”. Click Preview to view your GIF, then press save. If the timing is off, cancel and go back and adjust your timeline.
When your gif is saved, right click to open with> and select your internet browser.
Related Content:
Hand Lettering and Design – Workshop with Steve Simpson
Pattern Observer webinar: The Importance of Developing Collections