I’ve done a blog already about combining line drawings with digital illustration ( see: How I make my bicycle drawings and : How to use the live trace tool in Illustrator CS6 to digitise your line drawing) but what if you have some hand coloured pieces you want to include? One way would be to use Photoshop and cut out the image using the various selection tools. But in this example I will show you how to use Illustrator’s clipping mask technique. You will draw over the image and then cut it out using the part you drew kind of like a stencil. There is no crop tool in illustrator so the clipping mask is used for everything you want to cut out.
Use clipping masks to bring more texture into your work.
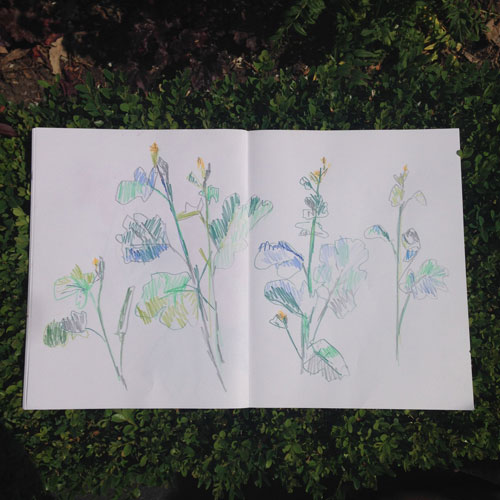
I used this technique to go from this:

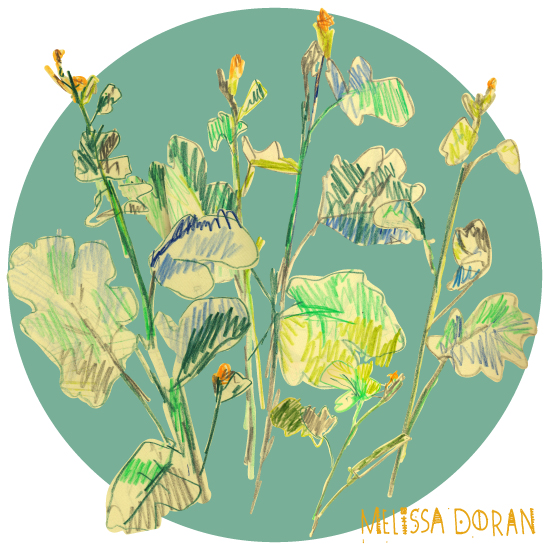
to this:

Scanning
When you are scanning in your image, it’s helpful to scan in individual parts separately – this will help reduce the file size of your working drawing – as opposed to having one A4 image that you are placing and clipping from repeatedly, which will make your file size huge.
Blob Brush
First place your image in your document (File>Place). Then go to the blob brush (From the tool bar) and draw over the part of the image you want to cut out. Make sure you have a colour in your tool bar so that it’s easy to see what you are drawing. If you like you can turn the opacity down in the options panel so that you can see through what you draw to the placed image and double check that you are doing it right. Usually I go ahead at full opacity then check at the end – when the opacity isn’t 100% the blob brush doesn’t work right – it doesn’t blob together!
Change size of Brush
The square brackets on your keypad change the size of your blob brush [ (left square bracket) makes it smaller and ] (right square bracket) makes it bigger. Same goes for changing the size of the eraser tool. If the shape you are drawing is selected and you use the eraser tool on it, only the selected object will be erased, keeping everything else safe (without having to lock it).
Compound Object
Once you have covered all your image using the blob brush, select any disconnected parts with the black arrow (use shift click to add to selection) being careful not to select the image itself. Very Important Step: Next used cmd/ctrl 8 to make what you drew into a compound path (or go to menu> Object> compound path> make). Now select both the blobbed shape and your placed image, then right click and choose>make clipping mask.
If everything disappears- click undo cmd/ctrl Z then go back a step and make sure you made all your blobbed shape into a compound path :)
Here is a timelapse of me clipping out the images:
Using Clipping Mask in Illustrator timelapse from Melissa Doran on Vimeo.
Now you have your clipped out image that you can use as part of your drawing.
Re doing the clipping mask
If you make a mistake with the blob brush drawing part and didn’t notice it until after you made the clipping mask, don’t worry you can still adjust it. Right click and choose “release clipping mask”. Now, don’t panic but the traced outline will seem to disappear – it’s still there but now it’s a path with no stroke or fill. Click directly on the path with the black arrow, then in the tool bar, add a colour to the fill box. Now you are right back where you were before you made the clipping mask so correct your error and go ahead.
Adjusting the image
If you need to adjust the colour levels on your image it’s best to do so in Photoshop but you can change things a bit under Edit> edit colours, and choose Saturate or Adjust colour balance. Not really comparable to what you can do in PS but can be handy once in a blue moon. Also if you want to explore, try layering your image with a colour beneath then use a blend mode on the image, you can find it if you click opacity in the options panel and change blend mode from “normal”. A blend mode is a relationship between two objects so you will only see a change if you have your image on top of something else.
This is a great technique to use for adding texture to your drawings so please experiment and let me know how you get on.
Clipping masks and lots of other useful creative techniques are covered in my Digital Illustration Workshop if you want to sign up.
Related reading:
