 Live Trace in Illustrator CS6: Tracing line art
1. First make a line drawing on paper and scan it in. Open Illustrator and go File>open to bring in one of your scanned images.
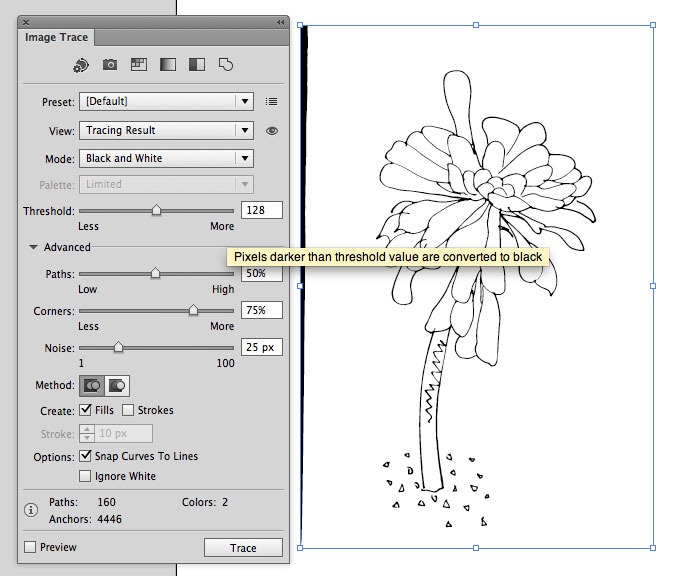
2. Open Image Trace Panel
Open up the Image trace panel (from options panel or from window>image trace panel ((depending on your version). Expand the panel so that you can see the advanced options.
When you have the image selected (just click on it once with the black arrow so that you see its bounding box around it), then click “Image Trace” from the options panel, or “Live Trace” (pre CS6).
Ideally your image should have a resolution of at least 300ppi (Illustrator might recommend you lower the resolution before tracing but ignore it).
You can trace any kind of image, black and white, greyscale, or colour by selecting the appropriate mode.
In this case choose Mode: Black and White.
Turn on preview checkbox at the bottom of the panel.
3. Refine Trace Options
Adjust the settings so that you aren’t loosing any detail from the image.
Click on “ignore white” at the bottom of the Image Trace panel. Always select this when your drawing is on a white background, it greatly reduces the size of the traced image. (If you have an off white tinge as your background instead of white, use the levels adjustment layer in Photoshop before tracing in Illustrator).
Minimum area can be adapted to pick up or to skip small detail.
In advanced options, look at the noise section. If you are getting interference, up the default of 25 to 50px.
Change the threshold settings depending on your image. Increase value if you are loosing detail: its default is 128, medium grey (value of 0 is black, 255 is white: setting it at 255 means trace absolutely everything on the page except pure white). Decrease if you are getting too much detail (eg some dust from scanner).
4. Expand and simplify
Once you are happy with the trace, the next step is to Expand and simplify.
Expand (from the options panel) converts the trace into editable path outlines. All the paths are automatically grouped, so ungroup by going to Object>ungroup.
Zoom into the most detailed part of your image for the next step.
Object>Path>simplify
Use this command to reduce the number of anchor points and make an image which is easier to edit and smaller size. Adjust the settings so that you don’t loose much detail. Up the angle threshold to 135 degrees and test (turn on preview button). Up curve precision to 100 then work backwards one percent at a time (click in the curve precision number box and press the down arrow key while watching the image and see if you are loosing any detail).
Occasionally, some unnecessary paths can be created during the live trace: some may be a blank outline with no fill or stroke. If you find one with the selection tool, go to “select similar outlines” from the options panel and press delete.
Now you have a vector version of your drawing you can scale it up without loosing quality and colour it in.
Related Reading:
How to make a Christmas Tree animated GIF
Hand Lettering and Design – Workshop with Steve Simpson